Wednesday, August 11, 2010

Gardening Novice: Still Learning

Remember the baby tomatoes from the first gardening blog? Click here if you don't have an idea of what I'm talking about.


The very first pot I planted didn't make it because the kitty cat neighbor played with it. The tomato plant you saw from the first blog was my second attempt. Unfortunately that cute little pot accidentally fell from the table when the gardener was trimming the grass in our patio. I was furious! I've been baby sitting the pot for four weeks and he just grr.... Gotta move on I guess so I planted the third pot.


After six weeks:


So cute right? I just have to wait for some  more weeks and I'll transfer it to the Tomato Planter. Here's some information from their website:


The Topsy Turvy® Tomato Planter is the unique and innovative way to grow your own fresh fruits and veggies. As Topsy Turvy® hangs upside down, gravity pulls the water and nutrients directly from the root to the fruit, giving you a deliciously ripe tomatoes! It's simple to use and saves time and space. Just hang it up, place any tomato plant in the planter, add your favorite potting soil, and water daily. The sun warms the plant like a greenhouse, the root system grows and thrives inside the planter. Plus, hanging in the air helps reduce ground fungus, harmful bacteria, cutworm damage, use of pesticides, digging & weeding and backbreaking work. What's more, it can also grow cucumbers, peppers, zucchini, and more, perfect for home-made sauces, sandwiches and salads.

Cool right?

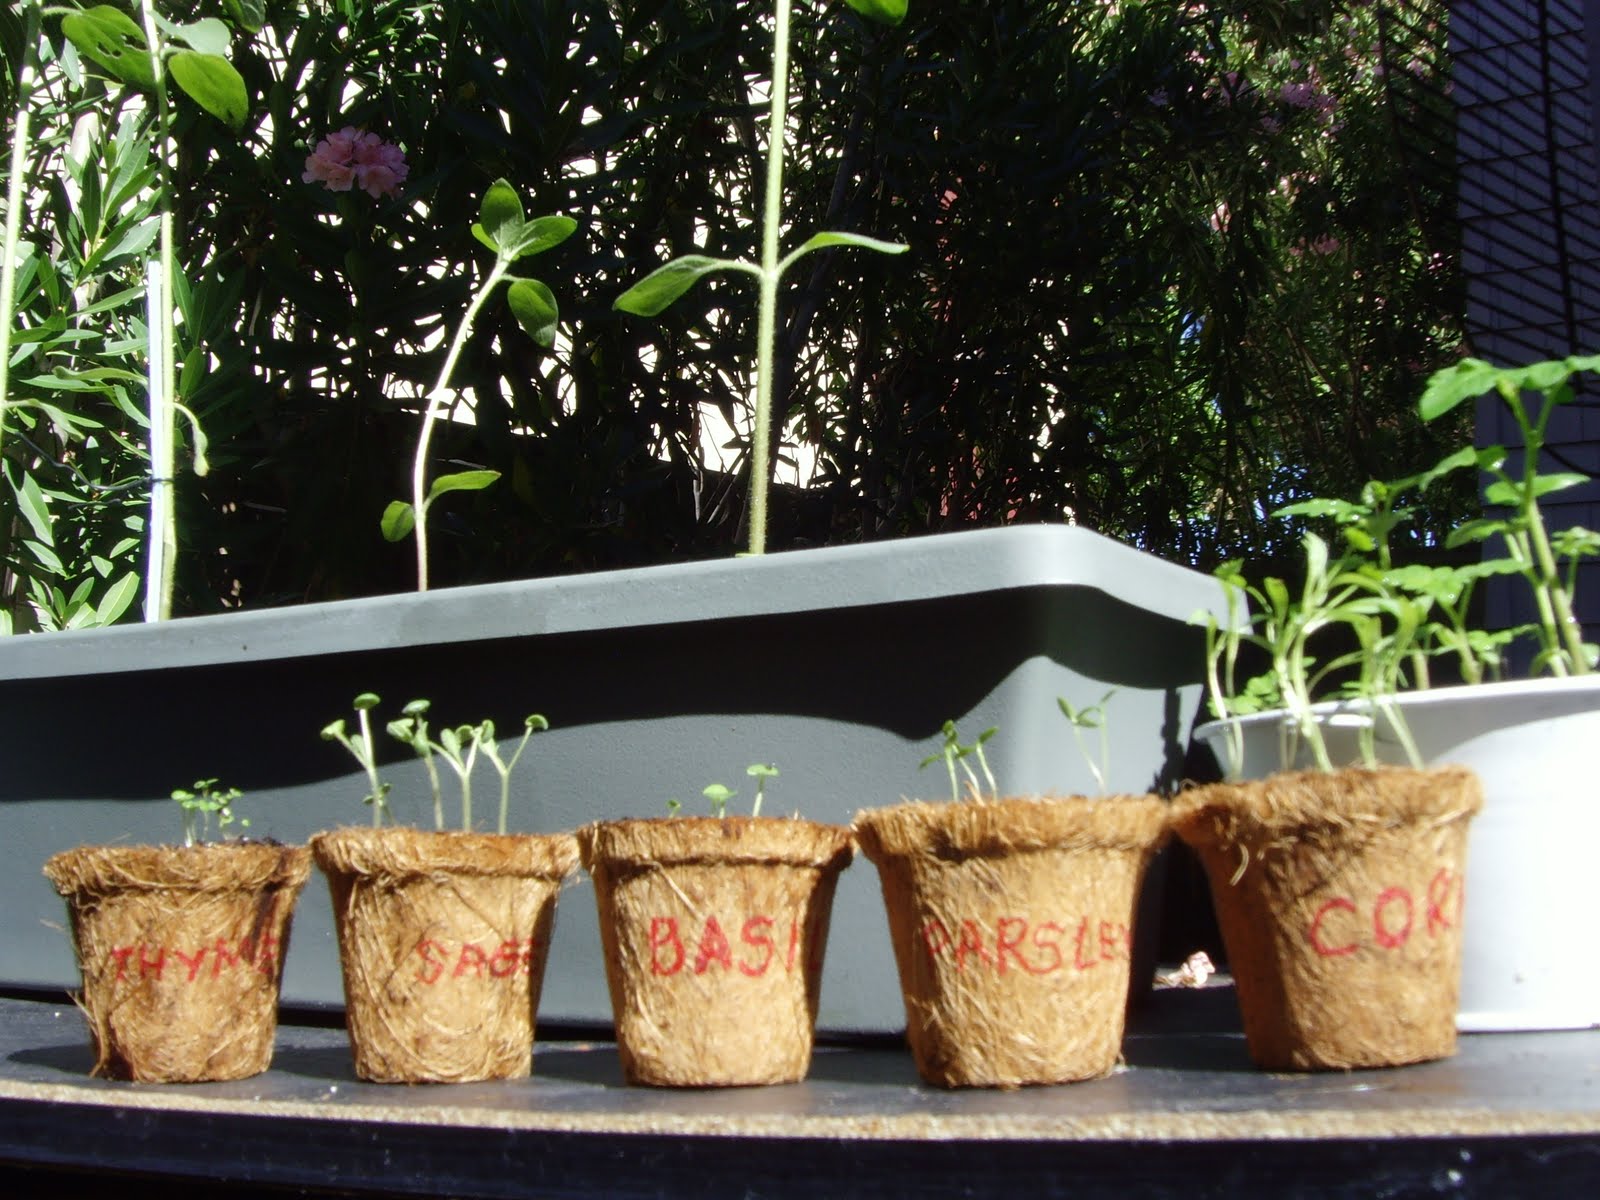
But that's not all. My DH planted sunflowers and me my herbs - Thyme, Sage, Basil, Parsley and Cilantro/Coriander! And these are our babies:


We usually don't put the plant directly under the sun in the afternoon because over the weeks we learned that the afternoon sun is drying the leaves out of each plant. The setup usually looks like this:


The sun shines here every morning so this is a perfect spot for the plants. We put it on top of the chairs because we have like a dozen of kitty neighbors. The sunflower pot has been victimized several times already. Maybe they thought its a litter box. We have two sunflower pots.


See what happened to the other pot. Only one survived:


We also learned that Sunflower seedlings are really sensitive. We originally planted eight seeds in one pot. I was doing my research and discovered that the sunflower plant needs a bigger room for optimum growth. So when the seedlings were about eight inches tall I told my husband to transfer four seedlings to the other pot. The roots are like the hair of a corn cub. So delicate that it broke when we were trying to dig and transfer them. Some got really disturbed causing them to wilt a little and grow slower than the others. Just the other day my DH forgot to put the pot back to the chair. The friendly kitty cat messed it up again! Good thing I was able to fix it right away. They're okay now but look closer into the picture. You'll see that there is a straw supporting one of the stems. It got broken during the "attack". Me and my DH are really anxious to see the flower bloom! 

Lets talk about my herbs. I planted the herbs about 4 weeks ago. The first attempt was not successful. I left the pots under the afternoon sun too long. They all wilted. So with the next batch I was very careful.The first three weeks I covered the pots with a cling wrap. According to my research it would keep the moisture and help with the germination process. True it is! The seedlings started to come out as early as the first week.


I found the fiber/pulp nursery pots from OSH (Orchard Supply Hardware). It looks really cute and its environmental friendly. Based from the instructions and information in the packaging there is no need for you to remove the seedlings from the pot to transfer it to a bigger pot or maybe to the ground. The roots grow right through the pot so you can just plant the whole thing to where you want to plant it.

The seeds we bought we're about a dollar each packet. You can plant a lot of pots from just one packet. You can set it aside for your next planting but keep in mind that they do expire.

I am excited to see it mature. I'm excited to cook and use my fresh herbs!

Saturday, August 7, 2010

No Sweat Mini Doughnuts

So I was surfing the  net the other night and came across this really enticing food advertisement. It was just a picture of a doughnut, a simple sugar doughnut. I am not a big fan of doughnuts with toppings or frostings. I like it really simple.

I tried making doughnuts about ten years ago. It was too much work. You need to knead and let the dough rise …yadiyadiya…

A few months ago because I was craving for doughnuts at 12am so bad so I decided to search online for an easy no yeast doughnut recipe. Luckily I found one and it was really easy to do! You’ll be eating donuts in 20 minutes! I just made little adjustments on the recipe.

Here it is:


Prep time: 18 minutes
Cook time: 2 minutes

Ingredients
2 tablespoons lemon juice (the original recipe asked for white vinegar)
3/8 cup (6 tablespoons) milk
2 tablespoons softened butter (original recipe: shortening)
1/2 cup white sugar
1 egg
1/2 teaspoon vanilla extract
2 cups sifted all-purpose flour
1/2 teaspoon baking soda
1/4 teaspoon salt
Oil for deep frying
Extra white sugar with cinnamon (original recipe: 1/2 cup confectioners' sugar for dusting)

1. Stir the lemon juice into the milk, and let stand for a few minutes until thick.


**The taste of your doughnuts will  have a hint of lemon after each bite. On your first bite you'll taste the sweet cinnamon flavor.Once you finish chwing then you'll taste the lemon flavor.

2. In a medium bowl, cream the butter and sugar together until smooth. Beat in the egg and vanilla until well blended.


3. Sift together the flour, baking soda, and salt; stir into the sugar mixture alternating with the vinegar and milk.


4. Roll dough out on a floured surface to 1/3 inch thickness.


5. The original recipe will tell you to let the dough stand for 10 minutes after cutting into desired shape. What I do is transfer the dough into a cling film and refrigerate it for about 15 minute. This will make the dough a lot easier to work with. You may cut it into 1-inch squares or shape it like a ball. The size will double once cooked.

6. Heat the oil in a skillet. You may use whatever frying device you have. I just use our tiny skillet and fill it half way with oil. Fry doughnuts in the hot oil until golden, turning over once. Sometimes it will turn by itself so you have to babysit. Don't worry it will only take a 2 minutes per batch. Don't burn it!

Drain on paper towels. Roll cooked doughnut in the cinnamon sugar while they are still warm. You may serve it still warm or cooled.


If you're not a cinnamon sugar fan, you may also just dust it with confectioner's sugar and dip the doughnuts in pastry cream, nutella or whatever chocolate sauce you have or maybe cheese. Its all up to you! 

I hope you like this recipe.!

Let me know if you have any question or suggestions. ENJOY!!!

**Sorry the pictures aren't very clear. I'll do better next time!

Wednesday, August 4, 2010

Korean Feast!

Me and my DH had dinner at  KOREA house at the Concord Park and Shop Shopping Mall. We've been crazy about this place ever since we discovered it. You will walk out so full that you can no longer stand up and walk!


The very first time I tried a Korean dish was just under a year ago. I took a short course on Flavors of Asia at the International School for Culinary Arts and Hotel Management (whew! thats a long name!) in Quezon City, Philippines. We made fifteen different dishes. I have pictures of the dishes on  my facebook account. If you wanna check it out here's the link-->KOREAN


I have always been skeptical about Korean dishes. Learning how to cook it didn't even change my mind. But there is always the first time. Often times that "first time" will eventually be "all the time".


Me and my DH discovered the KOREA HOUSE when Martin (my DH's brother) and his wife Lily came to visit us three months ago. We didn't know where to have lunch so we just drove to Concord Park and Shop since the boys wanted to go to Fry's too. 


It was a tough choice between the Vietnamese and the Korean restaurant. Me and my DH have already been to the Vietnamese restaurant. It was okay. Lily is Vietnamese so we were thinking she might like to eat there but she and the boys are willing to try the Korean restaurant. (By the way, the restaurants are just right beside each other. Imagine how we look like at that time!)


This is the KOREA HOUSE. It is just a small place BUT wait until you get your order!


Here is their menu:


click on the image to magnify. sorry the picture isn't very clear.


You'll see that their prices are very reasonable. They have a lunch special where they Bento boxes. Prices range from $7.45 to $12.95.They serve lunch from 11:00am until 3:00 PM.


It was  2:45pm when we got there but they still gave us the lunch special. We ordered four different dishes thinking each item is just good for one person. The boys ordered the Bul Kogi. One Pork and One beef. Lily ordered the San Sun Twi Gim or Fried Fish with Dipping Sauce and I ordered the Jaban GodungUh Goi or Broiled Mackarel.


After a few minutes they sent out the Bento boxes which looks like the picture below along with some other side dishes. At first we thought I think they gave us the wrong food. But NO. It comes with your order! And this is just the lunch special. By the way, you can ask for a refill of any side dish that you want! SUPER GREAT DEAL and everything tastes divine!


After a few more minutes our orders came out. Each plate is good for two or three people! It was crazy! Your table will be full of plates!


This was our first KOREA HOUSE experience.


Ok we're done with the Lunch Special. Let me show you how the regular meal looks like. Almost the same but servings are DOUBLE! And again you can ask for a refill.


This was our dinner earlier. Of course we didn't finish everything! We have food for tomorrow! :)

We never finish all the food every time we dine here but that's okay. They will give you take out boxes! They will also give you complimentary soda as you can see on the picture above. 

All the staff are Korean. They are kind of hard to understand so you have to listen carefully. They are really nice specially the lady below. We don't know her name. She will greet you the moment you walk in. She look a little eccentric but she is really nice. She always has a big smile on her face and she will teach you how to eat the Korean way. You will always hear her saying "Seaweed Sushi! Seaweed Sushi". Also, she will always say something to you in your native language. She says "Masarap" (delicious) and "Mahal Kita" (I Love You) to us.


The Korea House is HIGHLY RECOMMENDED. I LOVE the Broiled Mackerel and Pork Bul Kogi. I am officially addicted to it! We have yet to try their other dishes. I'm sure they all taste great.

If you are in Concord and you want great tasting food without spending too much keep this information: 
KOREA HOUSE
1835 Willow Pass Road
Concord, CA 94520
(925)-691-8888

Tuesday, August 3, 2010

Strawberry Thumbprint Cookies

I never had any formal lessons on baking. The first time I baked was when I was a high school sophomore. Me and my best friend joined the baking competition in school. We both never had any experience in baking  and  we just photocopied a recipe from a cook book at  one of the bookstores near our school. We weren't expecting any awards but we won 1st place! We made Strawberry Thumb Print Cookies. We didn't even had a slight idea what a confectioner's sugar is!

I did not keep the recipe. But I found one online and would love to try it.

Here is the recipe:

Thumb print Cookies:

1/2 cup (113 grams) unsalted butter, room temperature
1/4 cup (50 grams) granulated white sugar
1 large egg, separated
1/2 teaspoon pure vanilla extract
1cup(130 grams) all purpose flour
1/8 teaspoon salt
3/4 cup (100 grams)hazelnuts,almonds,pecans or walnuts,toasted and finely chopped (See Note)
1/2 cup jam

Thumb print Cookies:Preheat oven to 350 degrees F (177 degrees C) and place rack in center of oven. Line a baking sheet with parchment paper.

In the bowl of your electric mixer (or with a hand mixer), beat the butter and sugar until light and fluffy (2-3 minutes). Add the egg yolk and vanilla extract and beat until combined.

In a separate bowl, whisk together the flour and salt. Add the flour mixture to the batter and beat just until combined. If the batter is too soft to roll into balls, refrigerate for about 30 minutes.

In a small bowl, whisk the egg white until frothy. Place the chopped nuts on a plate. Roll the dough into 1 inch (2.5 cm) balls. Taking one ball of dough at a time, dip first into the egg white and then lightly roll in the nuts. Place on the prepared baking sheet spacing about 1 inch (2.5 cm) apart. Using your thumb or end of a wooden spoon, make a indentation into the center of each cookie and fill with about 1/2 teaspoon of jam.
Bake for about 13-15 minutes, or until cookies are set and the nuts have nicely browned. Remove from oven and place on wire rack to cool. 

Note: To toast the nuts.Spread nuts on a baking sheet and bake in a 350 degree F (180 degree C) oven for  8-10 minutes (almonds, pecans and walnuts). The nuts are done when they are light golden-brown in color andfragrant. Toast the hazelnuts for about 15 minutes or until fragrant and the outer skins begin to flake. Remove from oven and place the hot nuts in a dish towel. Roll up the towel and let the nuts sit (steam) for a few minutes then rub the nuts in the towel briskly to remove the skins. Let cool completely. Once the nuts have cooled, place them in your food processor and process until finely chopped. Alternatively, you could chop them by hand. 

Note: If you are planning to store these cookies, I like to bake them without the jam. Just reduce the baking time by a few minutes. These cookies can be stored for about a week. Fill the cookies will jam the same day as serving.

Makes about 20 cookies.

Your cookies should look a little like this:


This recipe is quite different from the one we baked in high school. I don't remember buying any nuts for our cookies. But it looks really good so I would definitely try it! Please try it too and let me know if it was a good recipe. Or if you have a good Strawberry Thumb Print Cookie recipe, share it so I can try try it too!

Hope to hear from y'all!

"MUNCH MUCH?"

Its been over a month (again) since I last blogged. I guess having 0 followers doesn't give me the kind of motivation I need so I can write.


I was browsing my sister-in-law's Facebook account earlier. I found out that she has also started blogging and its all about baking. Good for her! It motivated me to start blogging again. She also said said I should join Foodbuzz. It is a food blog community. You can link your existing blog account to your Foodbuzz account which is sooo great!
So I did it!

I've been planning to create a dedicated page for my food blogs for months but since I don't have any followers I didn't think it was a good time to do it. NOW is a great time I guess.

I love to eat and cook. I always wanna share a great recipe and any good eats I find. 
You can find the direct link for "MUNCH MUCH" right beside "It's A Wife's Life Home" on the navigation bar. 


 Wish me luck and I hope I get at least 1 follower who is not related to me.